 |

|
| Unreal Playground |
| Epic Games UT2004 Forum |
| Beyond Unreal |
| VGMP3.ORG |
 |
 |
UT2003/2004 Advanced Bot Pathing TutorialContents
|
Introduction, who should read this.Note: This original url of this tutorial was http://blitz.unrealplayground.com/tutorials/bots.html. This is a mirror based on the Wayback Machine archive.This tutorial is intended for people who have basic knowledge of mapping for Unreal Tournament 2003, and who are already familiar with the basics of bot pathing. If your bots are all standing in the corners and ignoring everyone, then this tutorial is not for you. If your bots are moving around and fighting, but just not giving it their all, then read on. To be specific, I assume that you know your way around UnrealEd 3.0, that you can find your way around the class browser, place actors in your level, and that you know how to lay out PathNodes. Nearly all the actors discussed in this tutorial can be found under NavigationPoint. Some game elements such as JumpPads, Lifts and Doors are covered in this tutorial strictly from a pathing perspective. I assume that you can set these up, or can find tutorials specific to these topics. I may point out that a JumpPad should be accompanied by some sort of emitter (for example), but I will not provide details here as to how to set up the emitter. Planning/Map LayoutRoutesOne of the most important things you can do to help out your bots is to plan ahead. Bots prefer wide paths and they play better when you give them lots of choices. If you are working on a capture the flag (CTF) map, then you'll need to give the bots (and human players) several routes to attack the flag. Bots will tend to take the shortest route when running to the flag, but don't worry. Later in this tutorial, we'll learn to set up AssaultPaths so that the bots can coordinate their attacks among multiple routes. Another aspect of planning your routes is to keep in mind that while players will readily translocate to grab a favorite weapon, bots may consider this too cumbersome. Bots translocate much better in ut2003 than they did in UT, but they still associate a small extra cost with the action, and need to be sufficiently bribed to perform the maneuver. Adequate bribes include: a nice powerup (supershield, etc); a shorter path to a flag, bomb spawn, or bomb gate; or a shortcut to a defense point if this is a base-oriented game like BR or CTF. Item placementA bot's main goal in life is to find interesting things and then kill you with them. Make sure this isn't all available in one spot. If you pile up your weapons, health packs, etc. in one location, that's where the bots will stay. They aren't very good at actually hunting down players. They will wander around and attack you when they see you. Keep this in mind when you are placing your items on your map. Distribute your items in such a way as to keep the bots moving and not focused on one particular area. If an area isn't worth any pickups or game objectives, then it's probably not worth having on your map. Another trick for item placement is to put weapons and ammo along the normal routes of travel, and put more powerful items (redeemer, udamage, wildcard) in harder to reach places. By putting lesser weapons and ammo in your "running lanes", you encourage your bots to stay focused on the game objectives, rather than on finding a weapon. This is especially important in deathmatch. Population ControlUnreal Tournament 2003 has a nice feature that lets mappers recommend the number of bots that will join in on their maps. Determine what you will use for this number while you are still designing your level. Decide how often you want the bots to encounter players (and each other), and keep this number in mind as you are balancing weapons, ammo, etc. Tools for PathingView PathsIf you don't already know this, be sure to view your paths while designing. Right click on the title bar in the 3D view of the editor, and select View->Show Paths. Your paths will show up as colored lines. The UDN (http://udn.epicgames.com/Two/NavigationAI) explains them thusly:
The most important thing to know about the paths is that you want to keep them white if you can. Bots prefer white paths so they have room to dodge and strafe. In some circumstances, bots will never follow blue or green paths if there are white paths available. This means keep your hallways and walkways wide, and keep your paths generally down the center. In UT, the bots tended to walk right on those lines, but in ut2003 they seem to stray a little more. On open terrain, lay out your paths like a web so that there are no areas that the bots can get stuck. Review PathsIf you read nothing else in this tutorial, read this! As you are building your paths, periodically run the "Review Paths" option from the Tools menu. When you run it, you'll see a progress bar with the heading "Reviewing Paths". If it has no errors or warnings to report, then the bar just disappears and that's it. Otherwise, a "Map Check" box will appear with a list of actors and warning messages. You can double click on any line to be taken to that actor in the 3D view. (You may have to click in the 3D view to have it jump to the right actor). These messages not only let you know about certain errors, but they also give you suggestions as to where JumpSpots (see below) can be added to improve flow. Other common warnings include unreachable inventory spots and paths that are too long. Here's a rundown of some of the common messages, what they mean, and what to do about them:
Debugging PathsEpic places some tools at your disposal for debugging bots. These are used in-game to follow the bots around and gain some insight into what they're "thinking". If you're having problems with your map, these tools are invaluable for finding trouble spots and testing remedies. Here's the first technique:
Another tool for debugging bots is the RememberSpot. This allows you to see the shortest path between any two points in a level. With this technique, you do not need bots in the level. To use this, go to a place in your level that you have questions about, and type RememberSpot at the console. You'll also need to have the debugging output on (ShowDebug). Now, as you run around the level, you'll see the shortest path back to your remembered spot continuously updated by tracing through the path network. This should give you insight as to where you need to add pathnodes to get the bots to travel more quickly. In a recent tutorial, Epic has revealed even more useful console commands:
SoakBots is a useful tool that deserves a bit of additional explanation. Turn this on at the start of your match, and play normally. If a bot gets stuck, or encounters any sort of error, the game will freeze, and you will be able to see the error, the AI state of the bot, etc. Once you have reviewed the situation, you can unpause the game by hitting ESC, and then pushing the "Continue" button. If the bot is in serious trouble, it may holler again, in which case you can either kill the bot, or quit and go fix your map. Other than forfeiting, I have not found a way to turn soaking off once it's been activated in a match. The next section deals with specific pathing situations. For each one, I provide a basic explanation of how it works along with some tips on advanced use and also how these actors can effect the flow of a map (for better or worse).
JumpSpotsDon't confuse these with JumpPads. JumpPads give a player a "boost" to another location, and effect humans as well as bots. JumpSpots are just for bots. They tell bots "here is a good place to jump." Most of the time, you will not need to change the JumpSpot's properties. Bots will figure out the best kind of jump to make, whether it is translocator, shield jump, double jump or even dodge-jump. Here's how to set one up:
It is not necessary to force a path FROM a jumpspot, but not forbidden either. If the spot is very high up, you will need a way for the bots to get back down. Placing a JumpSpot on the ground and forcing a path from your tower (or whatever) is a good technique to get bots to translocate down. Remember, if you don't path a way down, the bots won't bother to go up. Another important consideration is using JumpSpots for speed. Bots in ut2003/2004 do translocate ahead when running to flags or bombs, but they are still not as savvy as experienced human players. You can improve this by paying attention during play-testing. In objective-based games, try to outrun the bots. If you used some long translocator throws, try putting in some jumpspots so that the bots will make the same throws. Try outrunning them again. After a while, you'll get a feel for where it works and where it doesn't, but don't go overboard as too many JumpSpots can slow down the AI. Judiciously applied, this technique can make your bots quicker and more aggressive. Finally, this may seem obvious to some, but it is often overlooked. Make sure bots can reach all the areas of your map. Put JumpSpots on all the high places that players can reach, and make sure the routes are pathed. Areas that aren't pathed are virtually invisible to bots, and can be exploited by knowledgeable players. If you can translocate onto a building or cliff, make sure the bots can get up there and kill you. If you don't want bots up there, then use a blocking volume and keep human players off too. Advanced JumpSpotsReviewing JumpSpotsAs mentioned above, you can review your jumpspots by loading up your map (without bots) and typing ReviewJumpSpots at the console. You can watch as a bot tests every one of your jumpspots using translocator, shield jump, combo jumps and low-gravity jumps. The results are written to the log (found in <ut2003 dir>\System\UT2003.log). ReviewJumpSpots also takes an optional parameter, for limiting the types of jumps tested. This parameter can be any of the following: Transloc | Combo | Jump | LowGrav. The test bot will sometimes succeed and sometimes fail on the same jump, so you may need to test more than once. Also, if you have paths forced to the flag in CTF maps, the test bot will grab the flag, and may falsely report a failure on subsequent jumps to the flag (since the flag will no longer be there). Usually, this situation is evident from watching the bot. You should also consider watching the bots in-game for especially tricky jumps or translocations. During game play, bots will not always stand exactly on the PathNode they are jumping from. If the bots are not making every throw, make sure they are at least recovering smoothly. A well-configured JumpSpot should allow the bots to succeed at least 90% of the time. Tricky TranslocationsSometimes bots have trouble translocating to your JumpSpots. There are a couple of properties you can adjust to give the bots a little help in aiming. The first and simplest is to set the JumpSpot's TranslocZOffset property. This tells the bot how high above (or below) the JumpSpot to aim. A good rule of thumb is to always set this to 64 and only adjust it if needed. You may need to set it higher if the bots will be aiming along a particularly steep path. A side-effect of this method is that bots will tend to translocate to a spot in the air, and drop down. This makes it less likely that they will inadvertently telefrag one another. Some mappers like to have hidden or difficult to reach areas to hide more powerful pickups. For example, a narrow window through which a translocator can be tossed. With a little practice, human players have no trouble navigating such openings, but bots can have no end of trouble. For this type of precision aiming, you'll want to use the TranslocTargetTag property of the jumpspot.
To set up your jump, follow these steps:
You can use ReviewJumpSpots to test your window. UT2004 Only: Dodge JumpsUT2004 adds a pair of new properties to jumpspots:
JumpPadsAs mentioned above, JumpPads give players a "boost" from one spot to another. The UTJumpPad actor is not visible to human players, so you will probably want to accompany it with a base mesh, emitters, etc. Pathing JumpPads is much easier than kickers were in UT. First, place the UTJumpPad actor where you want your jump to originate. Then open up the properties. Under JumpPad->Sound, select a nice activation sound for the JumpPad, such as Sound'wm_sounds.wm_BootJmp' (feel free to select something more original). The JumpZModifier can be adjusted if you find you're not getting the right height on your jumps. Leave it at the default unless you need to tweak it. Any PathNode can be a destination for your JumpPad. Select or place a PathNode where you want your players to land, and note its Object->Name property. Then, place that name in the NavigationPoint->ForcedPaths[0] property of the UTJumpPad actor. TeleportersBefore explaining how to set up teleporters, it is worth mentioning that these should be used sparingly. Teleporters are a bot's best friend, but they can be a nightmare for human players because it is confusing to suddenly appear somewhere else on a map. Very rarely do teleporters actually improve the flow of a map, and they generally weaken it. But, if you "gotta have one", then read on. First, like JumpPads, teleporters are not visible to players, so they should be accompanied by some sort of emitter effect. Place a teleporter at both the source and destination of the teleportation. Your teleportation can be one-way, two-ways or even more confusing by having a teleporter be a destination for one, but a source for something else. I recommend against this last choice. Once you have your teleporters placed, choose a name for the destination. If this is a two-way setup, then choose a name for the source. Set the Events->Tag properties to the chosen name(s). Next, set the Teleporter->URL property of the source to the name of the destination, and vice versa for two-way teleportations. LiftsLift pathing is not always intuitive to new mappers. Here's a quick step by step on what to do for simple lifts:
UT2004 Only: Lift-jumpingIn UT2003 (and earlier), players could get a significant boost by jumping while riding up a lift. In UT2004, bots can do this too. To tell bots where they can lift-jump, you need to add an extra lift exit at the destination of the jump. Set up the lift exit as you normally would at the top of the lift, but also set its LiftJump->bLiftJumpExit property to true. Normally, bots will attempt to double-jump in the air in order to reach your lift jump exit. If this is causing them to miss, try setting the LiftJump->bNoDoubleJump property to true. DoorsThe BasicsThe UDN Suggests setting the AI->bAutoDoor property, but I have not had good luck with this. For simple doors that are closed normally and open when you approach them, follow these steps:
Note: if you want your door to stay open while a player is near it, and close as soon as they leave the area, then follow the above steps, but set the door's object->InitialState to TriggerControl. Be careful not to intersect your door mover or navigation point with a ZonePortal. This can lead to problems building the path network, and make your doors unusable by bots. See the Common Problems/Solutions section at the end of this tutorial for more details. Getting The Most Out Of Door TriggersThis isn't necessarily a pathing issue, but it's a handy trick, and worth mentioning here. Sometimes a trigger or pair of triggers is just not enough to cover your door. Rather than pepper your map with triggers, or increase your trigger radius/height to cover all you need and more, you can define the area precisely using a volume. Here are the steps:
LaddersLadders are relatively simple to path, but they are not very intuitive. The visible portion of the ladder is simply a mesh, a texture on the wall, or anything that gives players a visual cue that they can climb. If you use a mesh, I recommend turning off its Collision->bBlockNonZeroExtentTraces property and (if necessary) surrounding it with a blocking volume. To make the ladder climbable, you need to create a ladder volume. I recommend a minimum width and breadth of 64 units. The volume should start even with the floor and continue about 40 units above the top of the ladder itself. This is so that the automatic path actor (AutoLadder) is created at the height of the other navigation points on that level. Also, make sure the ladder is touching the wall being climbed. If necessary, use a blocking volume to provide the "wall." Once the volume is in place, you need to rotate it. In the top view, you'll see an arrow in the center of the volume. Use the Volume's LadderVolume->WallDir->Yaw property to change the direction of the ladder. As you might guess, the WallDir must point to the wall itself. In the top view, these are the appropriate values for the four major directions of the wall: Yaw: 0 (right)Yaw: 16384 (down) Yaw: 32768 (left) Yaw: 49152 (up) If your wall is at an angle, you will need to use a value somewhere in between. If you leave the bAutoPath flag set to true, the AutoLadder actors will appear in your volume the next time you build your paths. These need to be rotated in the opposite direction of the WallDir, which you can do the same way you rotate any other actor in the top view. If you have problems with the AutoLadders, you can set bAutoPath to false and place NavigationPoint->SmallNavigationPoint->Ladder actors in the volume manually. The center of the Ladder actor must be within the LadderVolume or it won't function properly. UT2004 Only: VehiclesVehicles travel along special PathNodes. There are different types for ground vehicles and flying vehciles. Vehicle PathNodes can be much farther apart than regular PathNodes, so keep them fairly spread out when pathing open terrain. Make sure your vehicles have a wide road to travel; they need room to maneuver. If your routes are too narrow, bots may abandon your vehicles and travel enormous distances on foot! RoadsRoads are defined using NavigationPoint->PathNode->RoadPathNode. As mentioned above, keep the road paths spread out. Bots will also travel these routes, and you will notice that other NavigationPoints will connect to them if they are in range. Don't lay out roads in a web like you might with ordinary pathnodes across an open space. Make a nice linear route that connects each vehicle and each objective. Roads must be comprised of white paths (see below). Flight PathsFlying vehicles use: NavigationPoint->PathNode->FlyingPathNode. These need to be placed in the air. They will connect automatically to any NavigationPoints on the ground. So, start above your flying vehicle and path routes to all the important areas of your map. To give your bots a better chance at dogfighting, lay FlyingPathNodes out in more of a web so they can range around rather than fly direct routes every time. If you have high mountains, buildings, etc., you may have to step your FlyingPathNodes up gradually to climb over the top. Pay close attention to whether or not they are linking to each other when you build your paths. Special DestinationsGenerally, bots view vehicles as a means to reach a major game objective. If you want your bots to stop and pick up other items (such as a redeemer), then you need to use: NavigationPoint->PathNode->SpecialVehicleObjective. Give your pickup a name in the Event->Tag property, and set the SpecialVehicleObjective->AssociatedActorTag to that name. Next, you'll need to specify which vehicles are capable of reaching this objective. Add each vehicle class to the AccessibleVehicleClasses array. Finally, you can optionally specify how near vehicles should be before attempting to stop at this objective. If you leave MaxDist at 0, bots will consider travelling to this objective from anywhere on the map. If you set this to any number greater than 0, they will only stop if they happen to be in the right vehicle and within that distance. The White RoadOnce your layout is finalized, it is vital to fly around in the editor and make sure there is a white path route between all of your vehicles and GameObjectives (flags, PowerNodes, etc). Raptors need only to connect to a flying PathNode route, but other vehicles should connect directly to your road. It's ok if there are some extra connections of green or blue, as long as the primary path is uninterrupted white. In other words, think of this as a single, white road that connects to each vehicle and each objective. Bots will only understand how to reach objectives if there is a white route from the vehicle they just hopped into to the objective they're seeking. If this route doesn't exist, then the bot will abandon the vehicle and proceed on foot. Reminder: To see whether your paths are white, right-click on the title bar of the 3D (or any) viewport and select View->Show Paths AssaultPathsOverviewIn ut2003, AssaultPaths replace the old AlternatePath with some more robust AI options. They are primarily used in Bombing Run and Capture the flag in order to recommend varied attack routes to the bases. You can weight the paths so that the bots will favor a particular route, but this is a decision that should be based on your map design. If you can't decide how to weight (prioritize) your paths, leave them all at equal weights and the bots should use them all equally. A Note About PlacementOn a couple of occassions, I have seen mappers lay out their AssaultPaths like regular PathNodes, so that the bots would run along a long, continuous route made entirely of AssaultPaths. This is incorrect. Think of AssaultPaths as a place where bots should pass on their way to the flag (or other objective), or as a place to gather for an attack. In most maps, only a few AssaultPaths are needed for each objective. Simple PlacementThe simplest way to use AssaultPaths is to place one at each entrance to your base. Let's assume you are pathing a CTF map, and each base has a left, right and center entrance. Here's the steps you would take:
AssaultPath PropertiesTo make more complex assaults, you'll need to understand all of the properties. Here's a breakdown of what they all mean: Format: Property (Default Value) Explanation...
A More Complicated Example
First, we'll add the paths for attacking the red base. We have placed our flag somewhere in the base, and given it a name by setting its Events->Tag property to "RedFlag" (without the quotes). For the sake of our example, we'll assume our base has two entrances near points D and E. Step one will be to place AssaultPaths at points A, B and C with the following properties: AssaultPath A
Our initial AssaultPath setup causes the bots to chose the center path about 50% of the time, and each of the side routes about 25% of the time. Because we anticipate our center route being a high traffic area, we decided not to allow the bots to group at this spot. They will press on and attack without necessarily waiting for reinforcements. On the brown and grey paths, the bots will wait at points A and C, respectively until they have sufficient numbers for the attack. The actual number that will group is based on the number of bots that are currently in "attack" mode. Note that all three paths have the same position. This is important, because when beginning the attack, bots will only consider AssaultPaths with the lowest position number. Now that we have our initial routes defined, we need to give the bots some direction for continuing on. We'll set up AssaultPaths at points D and E on our diagram with the following parameters: AssaultPath D
Bots use the PathTag property to determine which AssaultPath's they will consider when continuing on. So, bots at point A will continue only to point D, and bots at point C will continue only to point E. However, bots at point B will choose between points D and E (50% each). We don't want our bots to congregate this close to the enemy base, so we set bNoGrouping to True. Next, we would set up our blue base following basically the same steps as above. Now let us suppose that we want our bots to favor the two side routes when returning with the flag. Still working on the red base, let's make some changes. First, we'll add another AssaultPath at point B and call it B1. We'll change the properties of AssaultPath B so the two paths will end up as follows: AssaultPath B
Now AssaultPath B will be used only for attacking, and will be used 50% of the time. AssaultPath B1 (whose priority is only .1 instead of .5) will be used only for returning and will be used about 17% of the time (.1 / (.25 + .1 + .25) = .1666, or about 17%). Obviously, you can tweak the priorities however you like. Another Note About PositionsRemember that when starting an attack on the flag, bots will run to the lowest position numbered AssaultPath. This means that if they spawn closer to the enemy base, or on the opposite side of the map, they may need to go out of their way to begin the attack. Keep this in mind when placing both PlayerStart and AssaultPath actors. A Truly Advanced Note About PositionsDon't read this section if you are easily confused. There are some nuances to AssaultPath positions that I have not pointed out because they can be rather confusing. For those that require an exact explanation, I have included this section. You may safely skip this section if you are only interested in a basic assault plan, as all of the previous advice will work, even if the explanations were inexact. When your map is loaded, the first and last AssaultPath for each unique PathTag is marked. A path is first as long as it has the lowest position number among all paths that have at least one tag in common with itself. A path is last as long as it has the highest position number among all paths that have at least one tag in common with itself. Bots will begin their attack by randomly choosing among all of the paths marked "first", based on priority, but ignoring paths flagged bReturnOnly. Bots will return by randomly choosing among all of the paths marked "last", based on priority, but ignoring paths flagged bNoReturn. Once an attack or return path has been determined, one of the PathTags of the selected path is randomly chosen, and the bot(s) will then follow the paths matching this tag in order of position until no more paths with the selected tag can be found. After that, bots will take the most direct route to their objective. UnrealScriptedSequence (defense points)UnrealScriptedSequences replace DefensePoints from UT. They are usually used in CTF, BR and DOM maps, but can be used in Deathmatch as well. In goal-based maps, USS actors are associated with a game objective, such as a flag, bomb gate or domination point. In deathmatch, they are generally placed at a good "ambush points" where bots might wait for unsuspecting players to wander by. Many deathmatch maps (including some Epic) ignore these actors completely. You will find this actor under: Keypoint->AIScript->ScriptedSequence->UnrealScriptedSequence Strictly speaking, these are not really defense points, but scripts that will interrupt the bot with an instruction to run over and defend a spot for three seconds. To understand why this is useful, you need to understand something of how the bots behave. Squad AIThe AI in UT2003 is Squad-based. In a objective-based team game (CTF, BR), bots fall into three groups: Defenders, Attackers and Freelancers. The freelancers are the bots that wander the map, but are switched over to support either the attackers or defenders whenever needed. Attackers and Defenders will temporarily change roles at times too, but not as easily as Freelancers. In Deathmatch, all bots are Freelancers. Attackers use AssaultPaths to reach objectives. Defenders and Freelancers wander around picking up items and looking out for the enemies. Combat always takes precedence over whatever else the bot is trying to do, so if you're wondering why your bots are not occupying your nice sniping perch, it's probably because they're getting into fights on the way over. Defenders more or less focus on staying near the flag, but they rely on scripts to let them know what areas to concentrate on. As mentioned before, the scripts really just summon the bot over for a moment or two, and then control returns. So they are not really used as a place for the bot to stand and wait, but a method for keeping the bots close to home. As long as the defending bot isn't fighting, the script will periodically gain control and tell the bot "c'mere a minute." Freelancers usually do not require any scripting, but you can use scripts for these bots. In this case, the scripts are not team-specific, so freelance points can be used by any freelancing bot. These are probably useful along assault paths where you want your freelance bots to harass the attackers as they are attempting to reach the base. Again, the concept of how they are used is the same. Freelancers are periodically summoned to the script points for a period of 3 seconds. Using UnrealScriptedSequencesBefore I continue, let's find out about the properties we'll be using. Along with the properties are comments on how these are generally used on the Epic maps:
To set up defense points around your base, place the USS actors wherever you want your bots to stand. This is a directional actor, so be sure to rotate it so that it faces where you want the bots to face. If a particular weapon is advantageous from this position, set the WeaponPreference to that weapon. It is helpful if the weapon and/or ammo is available nearby. If you want bots to snipe from here, set bSniping to true, and set up a sniping volume if your situation calls for it. If you are setting up your defense point around a game objective (flag, bomb delivery, dom point), then you need to set all the defense points for that objective with the same tag and set that tag in the objective's properties. For example, if we are defending the red base for CTF, set up a bunch of USS actors in the base and on each one set the property Events->tag=DefendRedFlag . Then, we would go into the properties for the red flag and set GameObjective->DefenseScriptTags=DefendRedFlag (this is the default, but it never hurts to check). If you are setting up freelance scripts (see the SquadAI section), you need to give all the scripts the same tag, but not a tag used as a defense tag by any GameObjective. For example, give them all the tag: Freelance, or leave them all at the default tag. If you use more than one tag for your freelance scripts, the bots will ignore all but one group of them (where a group is a set of scripts with the same tag). There is no easy way to control or predict which groups will be ignored in this situation. Important note: if you use freelance scripts, it is important to use at least 5 or 6 scripts. Because of how the scripts are weighted and selected, it is better to have none at all than to have 1-4. Placement StrategyIf you've read this whole section, you should have a pretty good idea of how UnrealScriptedSequences work. There are many possibilities for good placement strategies, but the most common use is to place them at sniping points, and in the flag rooms. One or two at each sniping point should be sufficient. In the flag room, you'll want to put 4 or 5 around the perimeter of the room so that the bots will vary their position, and are also more likely to be somewhere in the room when the attackers arrive. I have also found it useful to position weapons in logical "defense point" locations within the flag room, exploiting the fact that bots sometimes camp these locations. As a final note, it is worth mentioning that you could play around with the AIScript section of the UnrealScriptedSequence to give the bots more complicated instructions. There is a very simple macro scripting language available as an array of commands. The UDN Site describes all of the commands (actions) in case you're curious. Game ObjectivesGameObjective actors are objects that represent goals in a game. They are flags, domination points, bomb gates, and ball spawns. This section covers the objectives you will normally use when mapping DOM, BR or CTF. There are some other objectives that Epic has provided, such as DestroyableObjectives, LockedObjectives and TriggeredObjectives, but these are beyond the scope of this tutorial. When you place objectives on your map, be sure they are well connected to your path network. Connecting your flag (for example) to a single pathnode will make your bots attack in a predictable manner. GameObjectives derive from JumpSpots, and can be found by expanding this actor in the class browser. Bots will also make better attacks if you force a couple of paths to the objective, just as you would to any other JumpSpot. The only exception to this is the xBombDelivery, where you will want to force a path from a single pathnode right in front of the objective so bots will double jump into it and score a touchdown. xBlueFlagBase and xRedFlagBaseThese are simply the blue and red flags for CTF maps. Place them in the appropriate bases, and make sure they are attached to your path network. Typically, you'll want to set the Events->tag to "RedFlag" or "BlueFlag", and then use this tag when you set up your AssaultPaths. You'll also want to check that the GameObjective->DefenseScriptTags is the appropriate tag for your UnrealScriptedSequences. You may want to check the height of the flags in game to make sure they are properly aligned with the ground. xDomPointA and xDomPointBAgain, this is relatively straightforward. These are the two points used in domination maps. Place them in the appropriate locations. If you set up defense points around your domination points, then you'll want to make sure to set the GameObjective->DefenseScriptTags property to the appropriate name. xBombDelivery and xBombSpawnAs you might suspect, these are used for Bombing Run. The xBombSpawn is where the ball will appear at the start of the match, and whenever it is reset. Place one in an appropriate location on your level. The xBombDelivery is the gate or "goal" used in BR maps. Place one in each base, and set the GameObjective->DefenseScriptTags, and Events->tag the same way you would for the flag bases (see above). You also need to set the GameObjective->DefenderTeamIndex to 0 for the goal in the red base and 1 for the goal in the blue base. There are two other necessary steps for getting the bots to use the xBombDelivery properly. First, you must force a path to the xBombDelivery from a pathnode close enough so that bots can score a touchdown with a double jump. Second, you must place one or more shootspots so that bots know how to shoot field goals. For each BombDelivery, place a shootspot equivalent to the defending team's color (BlueShootSpot in the blue base and RedShootSpot in the red base). This is where the bots will stand to attempt a field goal. When bots decide to use a shootspot instead of trying for a touchdown, they will try from the nearest shootspot along their current route. So if you include more than 1 per goal, you will probably have to use AssaultPaths to ensure that all of them are actually considered. Finally, if you think your bots are trying for touchdowns too often (or not enough), you can set the xBombDelivery->TouchdownDifficulty property. Set it somewhere between 0 and 1 where .1 is very easy and .9 is very difficult. In most cases, the default of .5 should work fine. Bots will decide to try touchdowns for a variety of reasons, based on the current score, health of the ballcarrier, time remaining, etc. The TouchdownDifficulty is used in conjunction with some of these other factors. UT2004 Only: Vehicles and Game ObjectivesAs mentioned above, it is very important to connect your vehicles to all of your game objectives via white paths. If you don't have a road path directly connected to your GameObjective, you must set the GameObjective->VehiclePathName property to the name of the nearest RoadPathNode (supply the Object->name, not the tag of the RoadPathNode). Common Pathing Problems/SolutionsThis section is meant to reinforce some of the principals explained in other parts of this tutorial. Be sure you read and understand the rest of this tutorial before reading this section. Wandering Bot SyndromeBots generally wander because the path network is not completely connected. Particularly, if you have PlayerStarts or GameObjectives disconnected from the rest of the map, you will see this issue. The Tools->Review Paths menu option will warn you of these issues, so if you are experiencing trouble, that is a good first step (see above for more details). In Deathmatch, bots may wander if they have nothing better to do. If a bot is loaded up on weapons and ammo, or has no one nearby to shoot, it may just stand around. Also, it will not be able to chase human players who have wandered off the path network. Bots will take shots at you if you are in their line of site, but will not come after you unless they can map a route there using the path network. Why Bots Ignore Parts of a MapThe answer to this differs for Deathmatch and Objective-based games. In deathmatch, there is a real art to balancing item placement and PlayerStarts to achieve a balanced map. If areas are difficult to reach, bots may ignore them. As mentioned earlier, bots will sometimes ignore blue and green paths in favor of white paths. Another problem could be one-way paths. Make sure your navigation points are connected by lines going in both directions. Sometimes a pathnode links down to another on a lower level, but there is no path back up. Bots that spawn below can become trapped, while bots outside this area may avoid it completely. Bots of lower skills will not make tricky jumps, or even translocations. If you have areas that are reachable with a quick translocation, consider a longer, slower walking route for lowly bots. In DOM and DM, you should never assume that the translocator is available, as many people play without it. Even in CTF or BR, this is true since mutators like Instagib turn off the translocator. In CTF, areas that require translocation are not usable by the flag carrier, so keep this in mind as well. In objective-based games, attacking bots will always take the shortest route to the game objective. The only way to control this is with AssaultPaths (see above). Defending bots will wander between defense points and generally stand guard. They will fan out a little and grab nearby weapons, ammo and other pickups, so put these along your defensive and attacking routes, rather than some out-of-the-way corner. The Ever-crouching BotsIn team games, particularly CTF, sometimes you'll find bots that are just crouching and not doing anything productive. This may be because they can't reach one of two things; the enemy objective, or a defense point for your base. Make sure that these are available and connected to the path network. If you have defense points and some bots are still crouching and ignoring them, you may need more. For a map targeting 16 players, it is not unreasonable to have as many as 5 or 6 (or more) defense points in each base. Another thing to keep in mind is that bots will go into "stakeout" mode periodically while defending or freelancing. This means crouching down and looking out for an enemy. In the normal course of things, they'll snap out of it in 5 seconds or so. If they are crouching longer, then you may need to adjust your weapon and PlayerStart positions. If your map uses "spawn rooms," try to keep them behind the flag (i.e. so the bots will have to move past the flag they are defending before getting into the action). You can put ammo in the spawn rooms, but if you put in weapons, the bots may stake out the spawn points. Try putting your weapons further out into the map. If you're worried about spawn camping, try using several spawn rooms instead of just one. The PhaseShift ConundrumThis problem is named for the map that I first encountered it in, CTF-PhaseShift by Rachel Cordone. In the first version of this map, despite the best efforts of both Rachel and myself, the bots would not capture the flag. The blue team would reach the red flag, and then freeze, unable to find a route back to the blue base. The red team rarely found the blue base at all. All ordinary pathing problems were investigated, but no errors were found. The bases in PhaseShift are essentially islands in the editor, connected only by teleporters. This in itself is not a problem, but they were unusually far apart in this map (over 60,000 unreal units), which turned out to be the cause of the bots' navigational problems. Moving the teleporters closer (just under 30,000 unreal units) solved the problem. I am not certain whether this is because of a problem specific to the teleporters, the overall path distance, or the distance between the flags. My primary suspect is the teleporters, so keep that in mind if you encounter this sort of problem. Update: A licensee emailed me with a little more information on this problem. The licensee writes, "...it appears that the problem is caused when the distance between the pathnodes at the extremities of the path 'network' in the map exceed 60 000 units, a negative integer is returned and the path building process fails." I am not certain whether this was the UT2003 engine, UT2004 engine, or (most likely) something in between. Since I've seen working UT2004 maps with path networks larger than 60,000 units in diameter, it is possible that this issue has been resolved in that version of the engine. Bots Won't Use Doors, or Doors Can't be PathedFirst, bots are happiest with Doors that use TriggerControl. With doors that use TriggerOpenTimed, or any other opening method, the bots will sometimes have trouble. If you can get away with TriggerControl doors in your design, then use them. If you have to use something else, spectate your bots and watch carefully for problems. Sometimes, with diligence, you can get them to behave. I have heard from a few mappers who have had nothing but bad luck with doors. In spite of my best advice, they continue to complain that the bots won't recognize their doors. While wrestling with this issue recently, I realized a possible solution. In my map, the Door navigation point and the door itself were being bisected by a ZonePortal sheet. The Door was omitted from the path network, and the bots would not recognize it. When I moved the sheet back so that it was touching neither the mover nor the navigation point, the paths connected properly, and the bots used the door without trouble. Since doorways are always a likely spot for ZonePortals, I can certainly see why some mappers have encountered this problem over and over. UT2004 Only: Hypnobender and Other Vehicle ProblemsMany mappers have complained of bots standing, apparently transfixed, next to the Hellbender. To avoid this, place a few ordinary pathnodes in the area around the door so that bots have room to maneuver around one another and jump in. Make sure the Hellbender connnects to your white road.
Sometimes bots will sit in the gunner's seat of the Hellbender and wait. Normally, another bot will hop in and drive away, but sometimes the gunner gets stuck. I have not yet found a solution for this, but I believe it is an AI problem that will hopefully be corrected in a future patch. Sometimes bots will hop in a vehicle and hop right back out again, taking off on foot or moving on to another vehicle. When this happens, the most likely cause is that the vehicle is not connected to the objective the bot is seeking. Again, see the white road section for more details. SummaryI hope you found this tutorial helpful. I spent a good deal of time testing and researching many of these topics, but I am only human. If you find errors or items in need of clarification, please email me at: blitzthethief@delta-quadrant.net. Mike 'Blitz' Breuerblitzthethief@delta-quadrant.net http://www.unrealplayground.com/mapper.php?id=1685 |
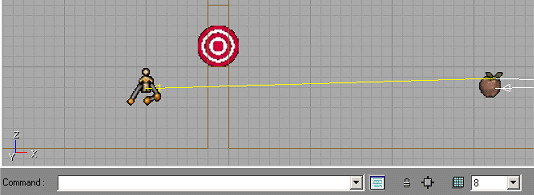 This technique involves placing a jumpspot beneath the window and then
forcing a path from the other side of the window to this jumpspot. In
order to force the translocator to be thrown through the window, a target
is placed within the opening and associated with the jumpspot. In the pictured
example, I used a window opening of 48 (height) x 16 (breadth) x 72 (width). The
bottom of the window is 64 units above the floor. The target is a generic
actor provided for such uses, called a LookTarget (found under Keypoint).
This technique involves placing a jumpspot beneath the window and then
forcing a path from the other side of the window to this jumpspot. In
order to force the translocator to be thrown through the window, a target
is placed within the opening and associated with the jumpspot. In the pictured
example, I used a window opening of 48 (height) x 16 (breadth) x 72 (width). The
bottom of the window is 64 units above the floor. The target is a generic
actor provided for such uses, called a LookTarget (found under Keypoint).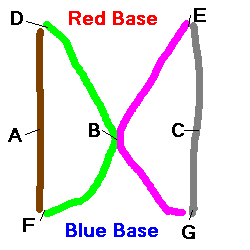 Now that you understand all the properties, let's walk through
a complex example. Take a look at the picture on the right, and imagine
this is a top view of our CTF map and the colored lines represent routes
the bots can take. The letters represent points where we will add our
AssaultPaths. Also assume that there is an intersection at point B,
so bots can continue along either route.
Now that you understand all the properties, let's walk through
a complex example. Take a look at the picture on the right, and imagine
this is a top view of our CTF map and the colored lines represent routes
the bots can take. The letters represent points where we will add our
AssaultPaths. Also assume that there is an intersection at point B,
so bots can continue along either route.